 There are many good reasons busy educators subscribe to blog sites, well-funded web-based platforms, and learn to become “Google educators” etc. Some are practical, some financial, and no doubt some are institutional. I still think there are many good reasons to do it yourself. I think they’re for the most part soundly pedagogical, and hardly ever mutually exclusive from any or all of the above. For me it’s all part of digital literacy for the 21st-century.
Digital literacy for the 21st-century
I’m going to share how I’ve set up SingingForLove, an “art-educational workshop” pilot I’m undertaking this summer with recognized Mexican women’s rights advocate, counselor, recording artist and performer Rosy Cervantes, Counterpoint Counselling & Educational Cooperative Inc., and the help of the Toronto Arts Council.
This site needs to be a safe space for minors who may be victimized and stigmatized by various forms of domestic violence. They need privacy and empowerment. I’m setting this up with the same open philosophy by which I once ran an inclusive, 5000+ user collaboration system for students, faculty, staff, and many other stakeholders at the Faculty of Education at York University for almost 10 years. They will have the power to make mistakes; the biggest mistakes they can make can not result in consequences that extend beyond our community. No one external will see them, or anything they do. Internally, this land is their land. Only the name or nickname they already use in weekly group will appear here, unless they choose otherwise. Rosy and I supply followup and extension of weekly group sessions, support and encouragement. They can exchange messages, create buddy lists and forums, and post whatever they wish.
The critical path of this exercise is as follows.
- If you want other people to see your site, purchase web hosting.
- it’s possible to use the test site we’re about to set up in a classroom without Internet, but I’m not going to discuss that today.
- it’s not absolutely necessary to acquire hosting first but, as we’ll see shortly, it can help… and you won’t be able to complete the last step until you do, or get full rights to a folder on someone else’s server.
- it’s absolutely necessary to pay extra for SSL (and therefor a “dedicated IP address”) if you want to provide your community privacy and security—and there’s every reason you should: encryption is a human rights issue, not least because governments have locked people up for accessing certain sites, among other things. Encryption makes snooping more difficult and expensive. SingingForLove will move shortly to its own domain, where it will be https-only.
- Set up a test site
- Install and set up WordPress
- Add and configure the right plug-ins
- Move it to your live web host
Set up a test site
The fastest cheapest easiest test site can be had by downloading and installing a so-called AMP stack. this is a preconfigured web developer meant environment that will run from a folder on your hard drive or a USB. You might find a WAMP, MAMP, or LAMP, for Windows, Mac and Linux respectively, but the one I use is called XAMPP, which has cross browser (“x-browser”) support, not to mention another P, for Perl.
Download XAMPP now.
Got it? Good. Open the compressed folder you downloaded and then extract the xampp folder you see there to your hard drive (C:\ maybe) or external drive (I’ve used both USB and flash drives successfully).
Open the xampp folder you just extracted, and have a quick look. The file that launches XAMPP is different for each supported operating system. Identify the ones for your operating system with file names that begin xampp_start and xampp_stop. You might want to create shortcuts to these two files, and place them on your desktop.
Now find the folder htdocs. This is where all the files for your website will go. If you’re the curious type, you can start XAMPP now, browse to localhost and see what these files are all about, but if you want to get on with setting up a learning environment with word press you can just empty it.

Install and set up WordPress
Download and extract WordPress
You get WordPress here. When it finishes downloading, open the file you downloaded and put everything in it into the htdocs folder you emptied in the previous step.
Launch PHPMyAdmin to create your database
This is the only tricky part for me. If you’ve bought web hosting, it’s a huge advantage to name the database you’re creating now the same as it is, or will be on your hosting server. almost every web host gives you a secret ID, and prefixes it to whatever name you type in, usually based on your project or business. You’ll probably end up with something like secretid_MyWordPressDB
Point your web browser to http://localhost/phpmyadmin/ (if you’ve launched XAMPP you can click that link to open it now in another tab or window).
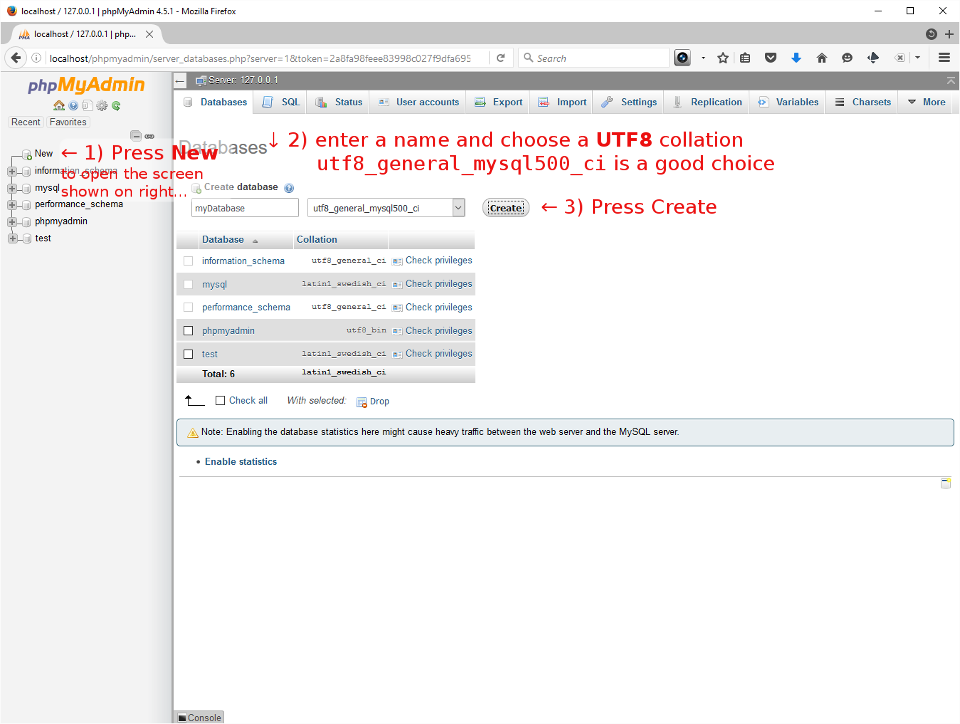
Create your database
- Press New in the left side panel to open the Databases tab.
- First choice is to give it the same name it has, or will have, on your live server.
- Choose a UTF8 collation. utf8_general_ci and utf8_general_mysql500_ci are both good choices.
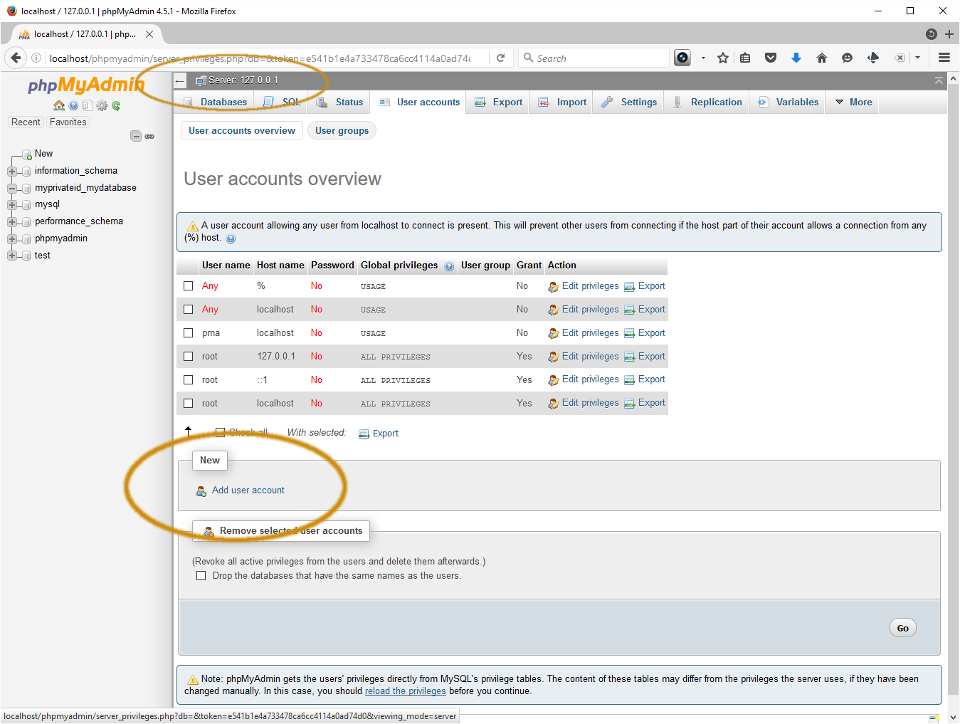
Create a user to control the database
- Click the PHPMyAdmin logo to return to the database server home page (breadcrumb menu says 127.0.0.1), and then choose the User Accounts tab. Find the New section and press Add user account.
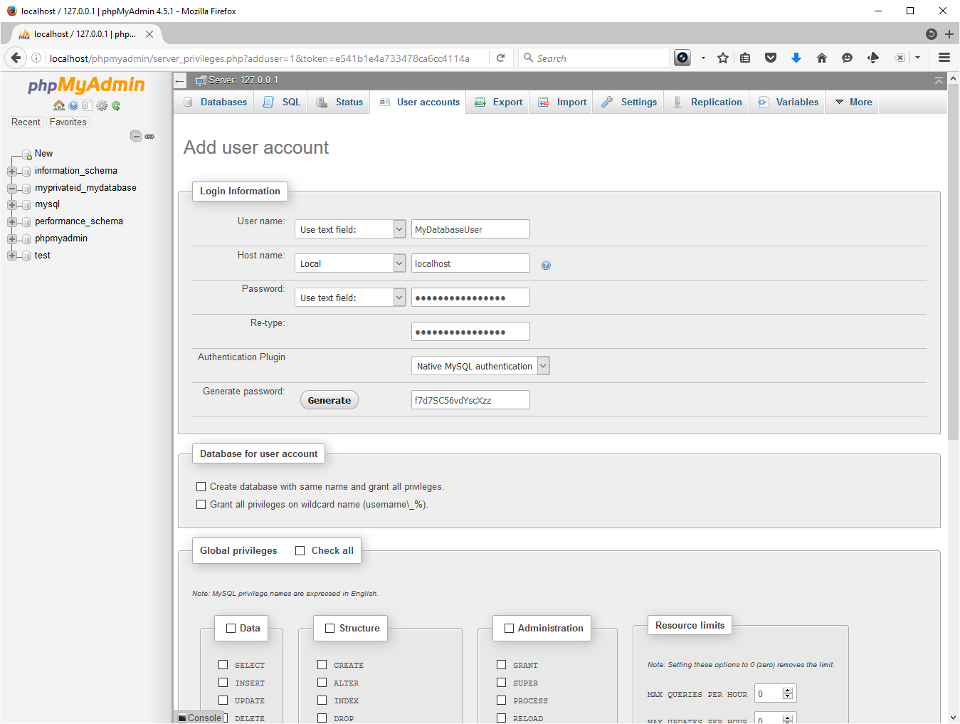
- Enter Login information.
- Choose a User name noone’s likely to guess,
- set the Host name to local [localhost],
- use the Generate button to get a strong password, and write all this information down.
- Scroll to very bottom of the Add user account form and press Go to create the user. Do not create a(nother) database, do not assign privileges (yet).
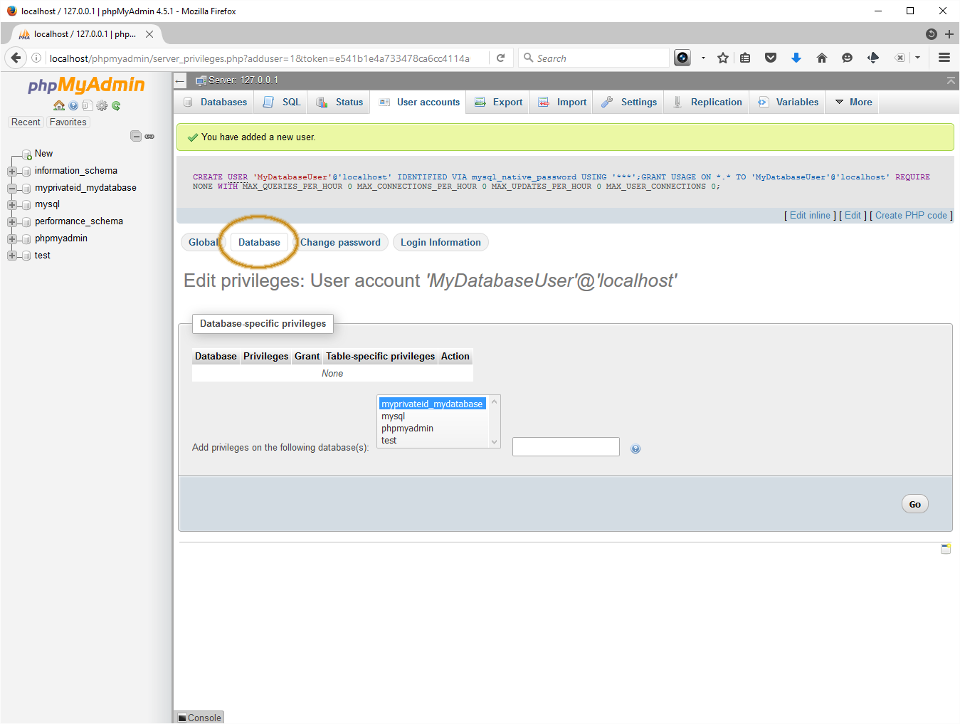
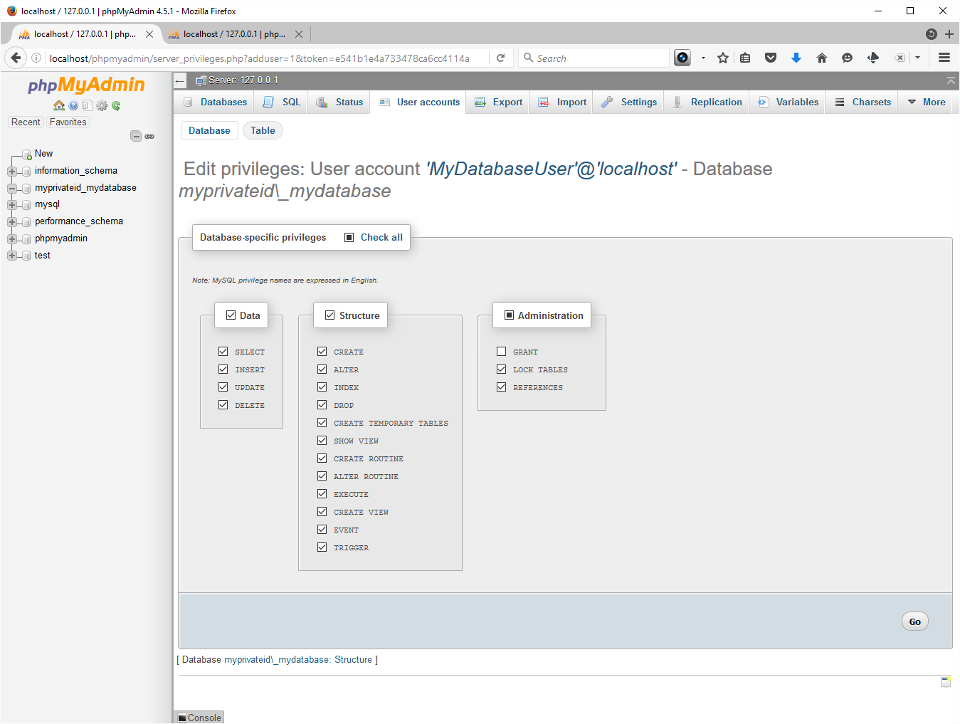
- The screen that appears should tell you you’ve added a new user. Open the Database tab, find the Database-specific privileges section and select your new database from the list.
- With your database selected as shown, press Go. This will open the Edit privileges tab. The WordPress user requires all permissions except Grant. I normally check Check All and then uncheck Grant under the Administration section.
- You should expect to see the form reload with a new notice, “You have updated the privileges for ‘MyDatabaseUser’@’localhost’,” where MyDatabaseUser is the name you actually used.
- Equipped with an empty database, a database user name and password you’re ready to finish installing WordPress.
Place this information in wp-config.php
Have no fear. If you’ve done everything just as I said you’re about 6 clicks away from launching your new WordPress site on your own test server. You do all of this…
… From the install page…
- Point your web browser to http://localhost/.
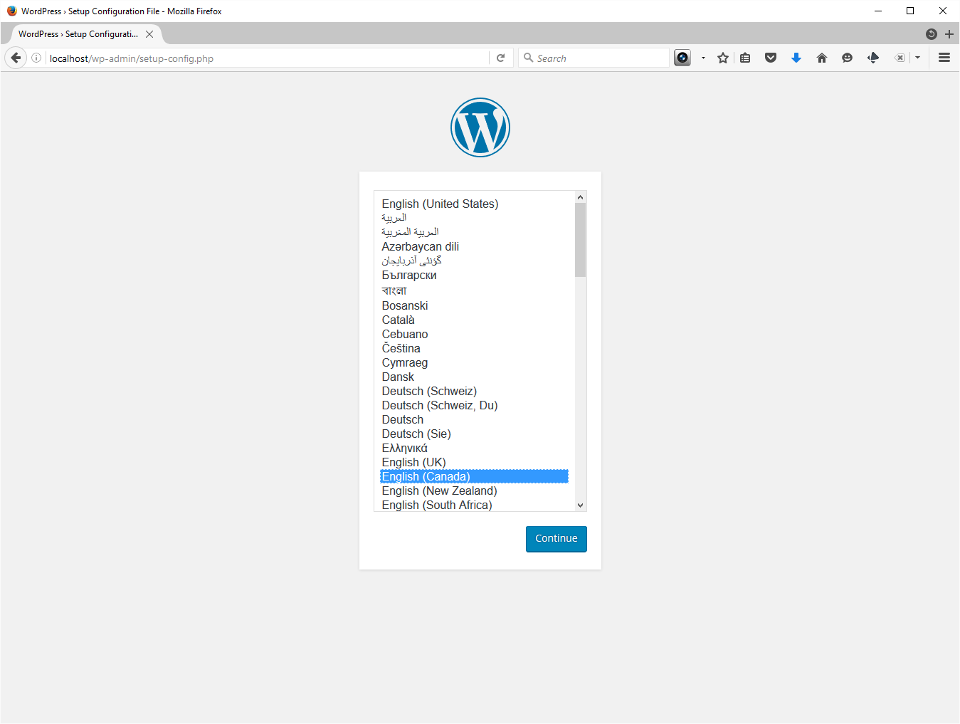
- Choose your language.
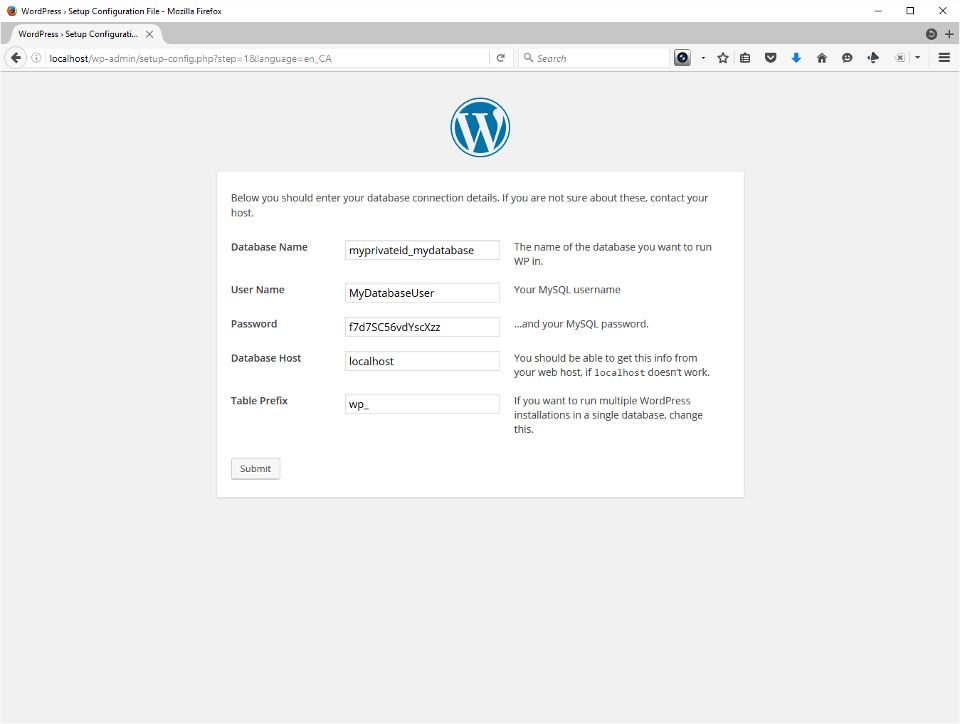
- Enter the information you just created. It should already be looking on localhost, and you should leave the Table Prefix alone. Press Submit.
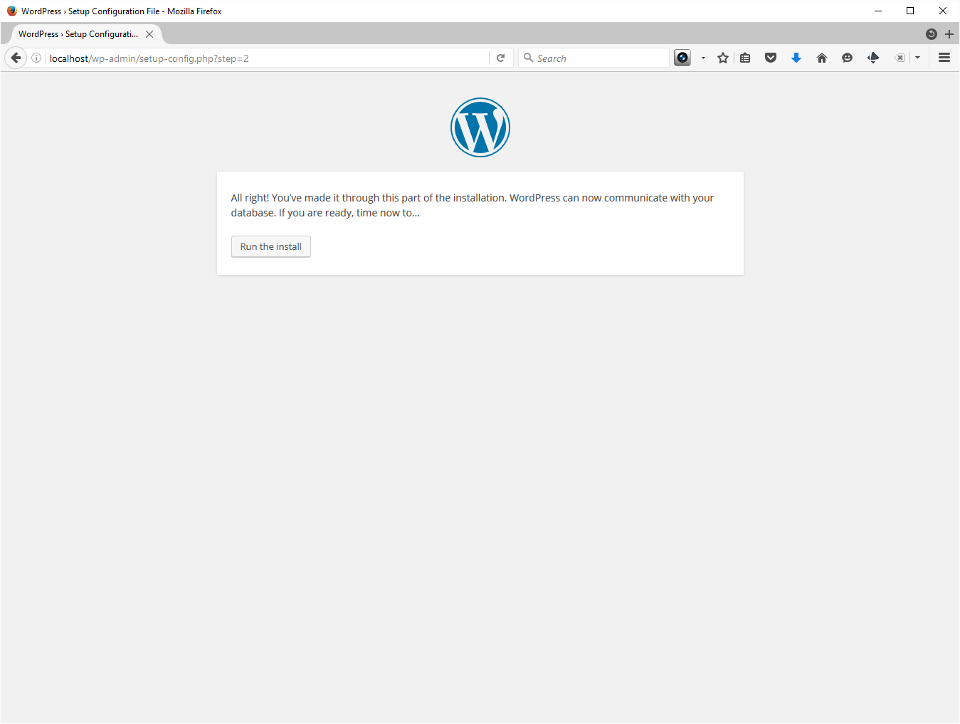
- You should now see a message that WordPress found your database and everything’s going to be okay. Press Run the install.
- Now you’ll enter the site’s public name and create an administrator account. In my experience this username should be kept secret, and not resemble your real name or nickname you might want users to find you by. As always on the Internet, you need a strong password. Write it down! Enter a valid email address and choose whether to be visible to honest reputable search engines. I usually check this for my test site and turn it back on when my site’s launched.
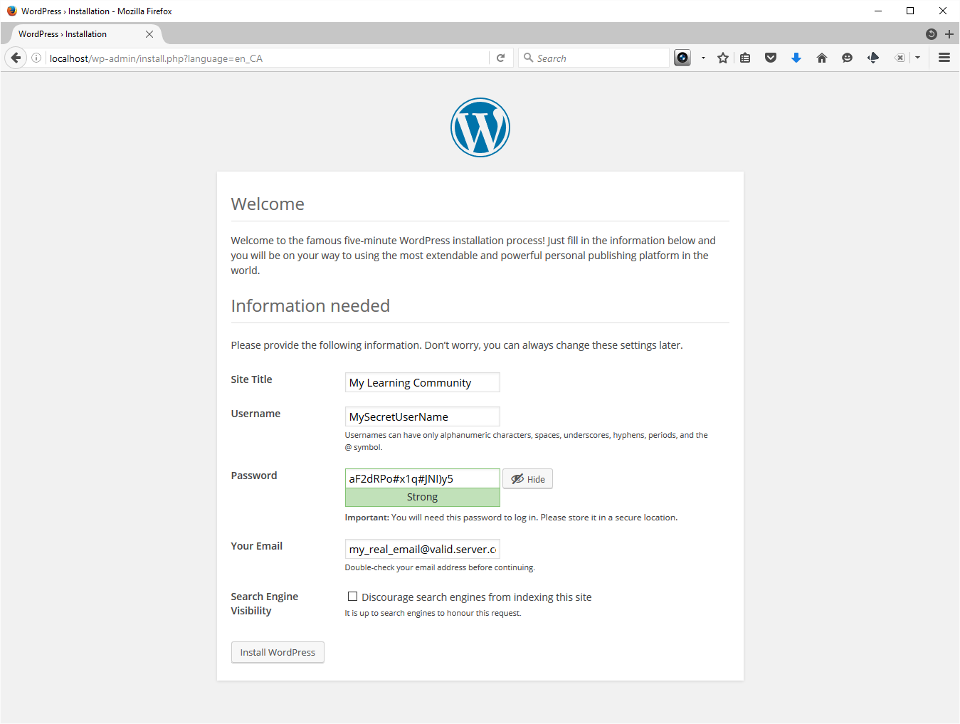
- Login to your new site.
- Apply any and all updates that may be awaiting you!
- Install and configure the plugins to finish setting up your secured online learning community.
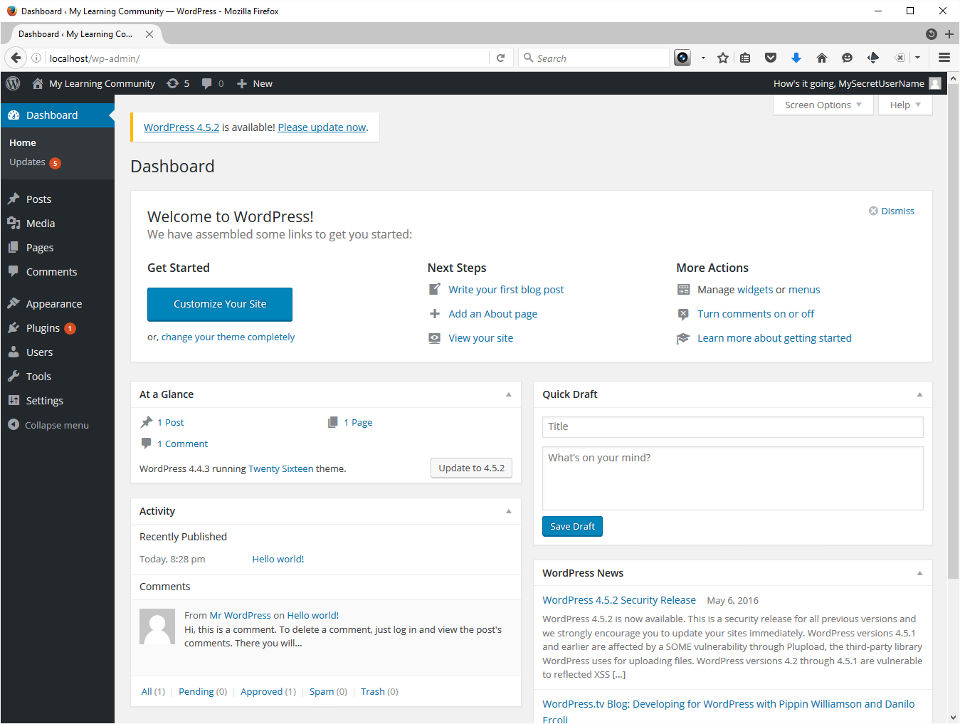
A note about updates.
It’s rare that there aren’t WordPress updates available from the moment you first log in. Updates often provide security fixes, and should be run promptly when offered. You need to update plugins, themes and translations. When you choose a theme for your site it’s a good idea to remove the ones you’re not using. I also make it a habit to delete the default Hello Dolly plugin. I’m not going to show any of that here today.
Set up your secured online learning community
Add and configure plug-ins
These are presented in an ordered list, but some variation is allowed. Akismet (anti-spam) and my security plugin of choice, iThemes Security (anti-hacking/site intrusion), belong in every standalone WordPress blog. I set them up in this order, but APIs won’t actually work on a ‘localhost’ server, and you don’t actually need them until your site is on the Internet.
It seems intuitive to install BuddyPress before its various helpers/add-ons, but I’ve added and experimented in different orders on my test and live servers without obvious problems. I put Restrict Widgets last on the list because several of the others supply widgets, and you then set their visibility from the standard WordPress Widgets page.
Even without security it’s very unlikely your XAMPP-powered test site will be hacked while you configure these. I recommend installing and activating each of them in one task, and configuring them one by one in the very next.
- Akismet is pre-installed, but you need an active API key (free; required for your Live server only.)
- 5-10 minutes, can be postponed until site goes live.
- Follow the instructions to obtain and install the free API key, or it doesn’t work
- iThemes security with API key (free; required for your Live server only.)
- 2-3 minutes to achieve superior basic security
- Sign up for API (free) and then press a button to run “Security Check” test/check/setup.
- BuddyPress and friends
- 30-45 minutes to install and configure all
- If you’re on the Internet, go to WordPress Plugins and use the Add New button, search one-by-one for the names on this list, Install Now and Activate the plugins
- If you’re not on the Internet you need to download these when you are, and later extract the ZIP files you obtain into your
xampp/htdocs/wp-content/pluginsfolder -
Components:
I enabled all of them except Groups, which the tab shows is Retired, superceded by bbPress forums, which we’ve also installed.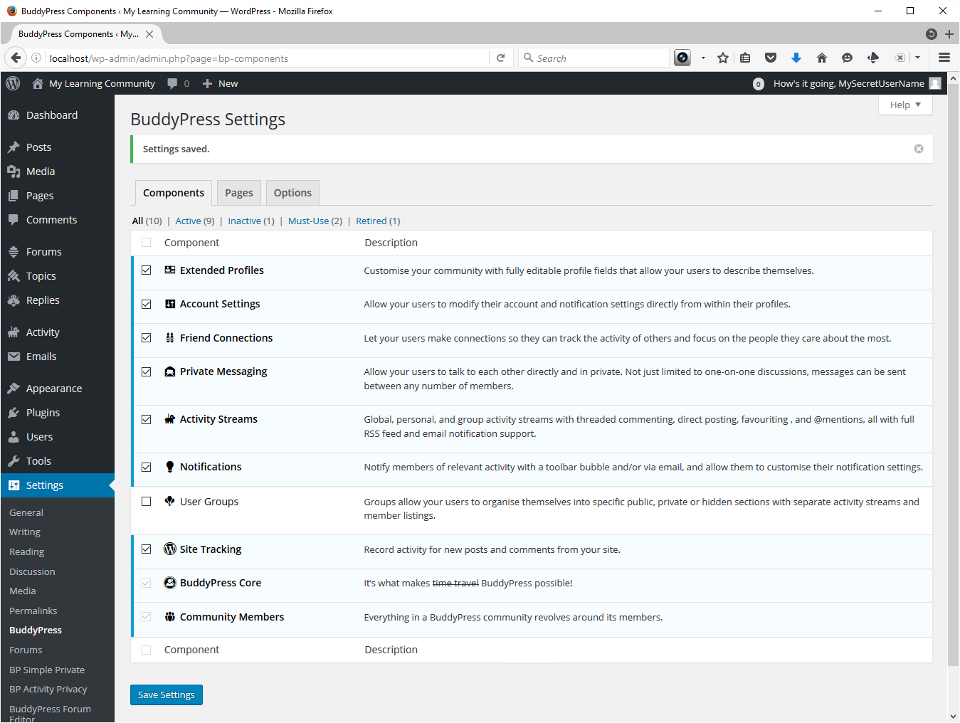
Pages:
For a private community I accept the defaults and change nothing.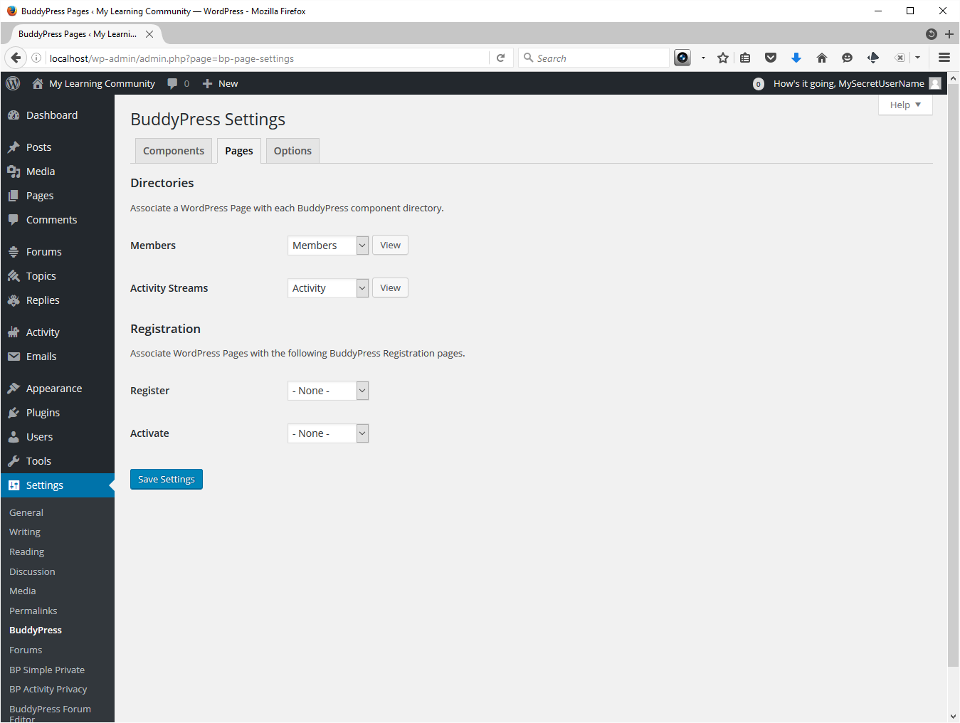
Options:
I turn on everything except Show the Toolbar for logged out users.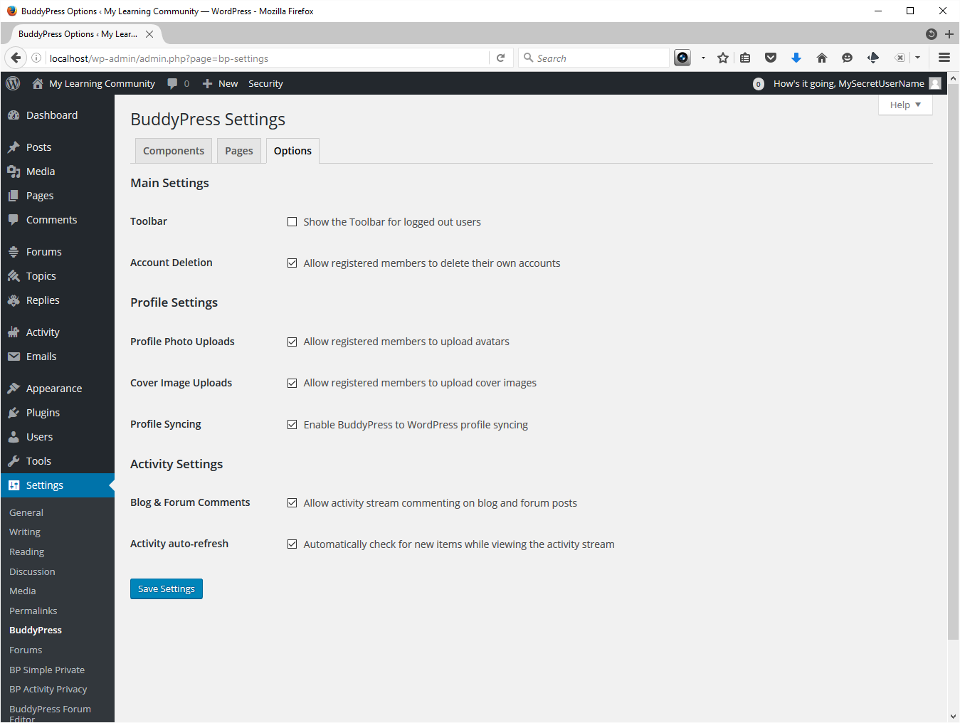
- bbPress (Forums)Before I configure forums I create a private Forum, named after my community, to be the root of all forums.
- 5-10 minutes
-
Forums:
I start by creating a Private forum to hold other Forums. From the Dashboard choose Forums→Add New. Look in the Attributes panel on the right and set Visibility: Private.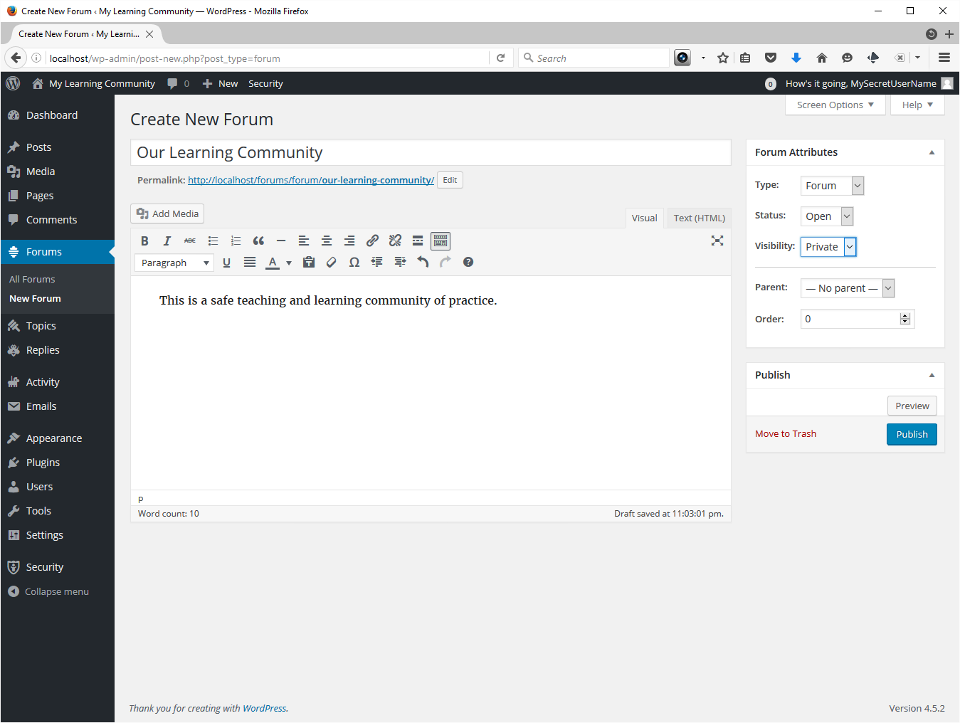
-
You can find global Forums settings under Settings→Forums or from Plugins→bbPress→Settings. I only make 2 changes.
Editing:
I think people should have plenty of opportunity to revise and edit. I bumped this all the way from 5 minutes to 1440 (24 hours).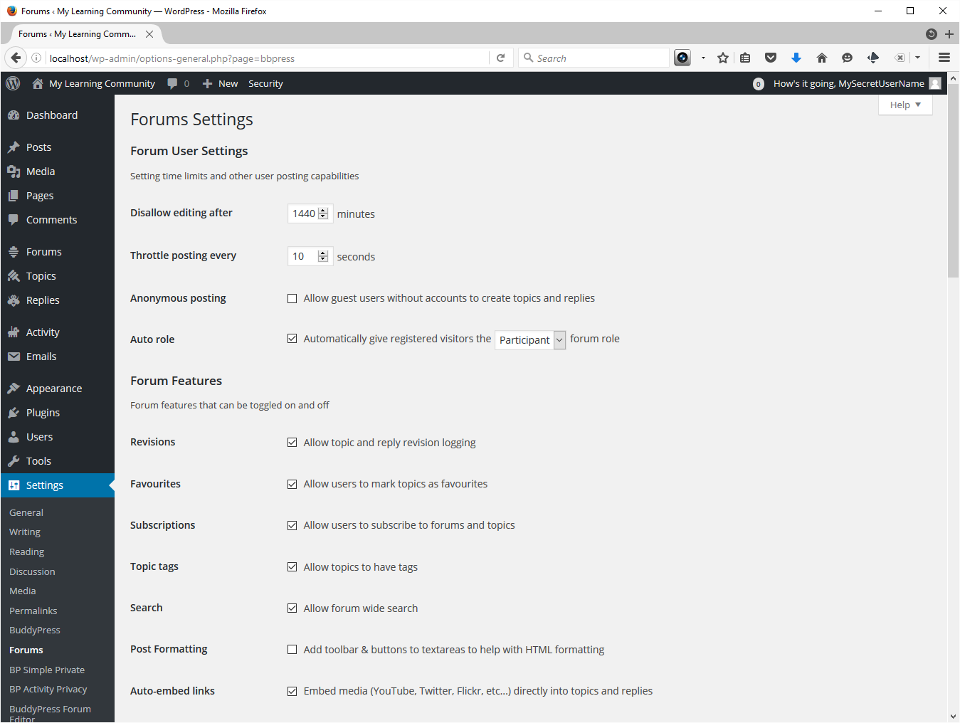
Group forums parent:
Scroll to the bottom of the Forums settings page, and in the BuddyPress Integration section set Group Forums Parent set to the private forum we created in the previous step.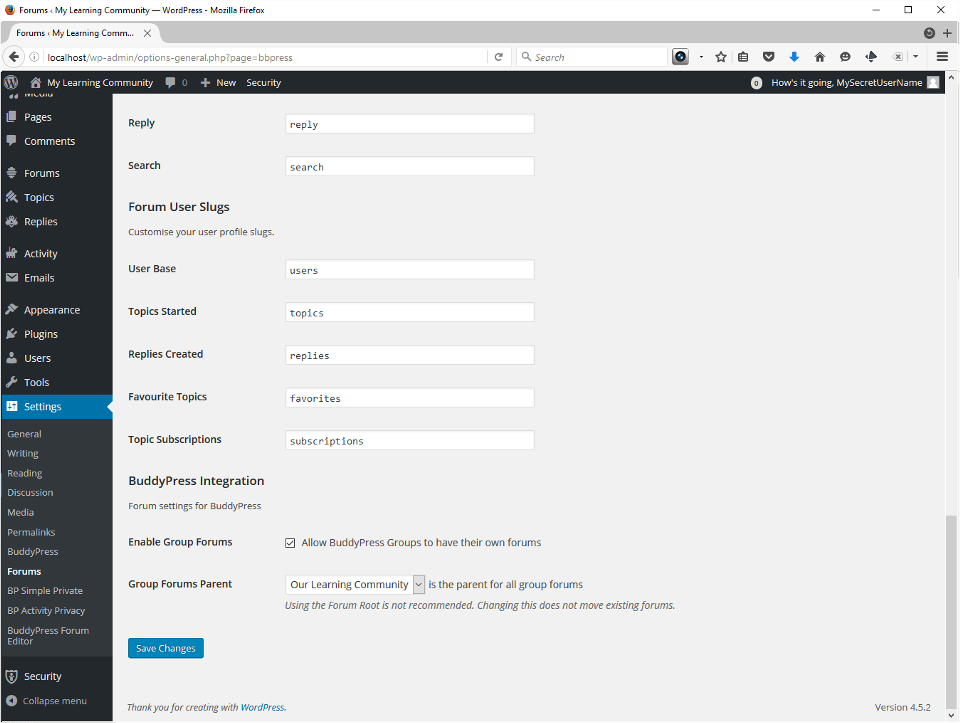
- BP Simple Private
-
Important!:
This is the plugin that hides Members and their Activities from non-logged in users, and lets everyone choose whether to make posts and pages private when they’re created. I check all the boxes.
-
- BuddyPress Activity Privacy
- 1-2 minutes
-
Also important!:
The BuddyPress Activity Privacy plugin gives users control, to send private message to friends and admins, etc. The sections correspond to dropdown selectors. I disable Anyone and set the default to Logged in users.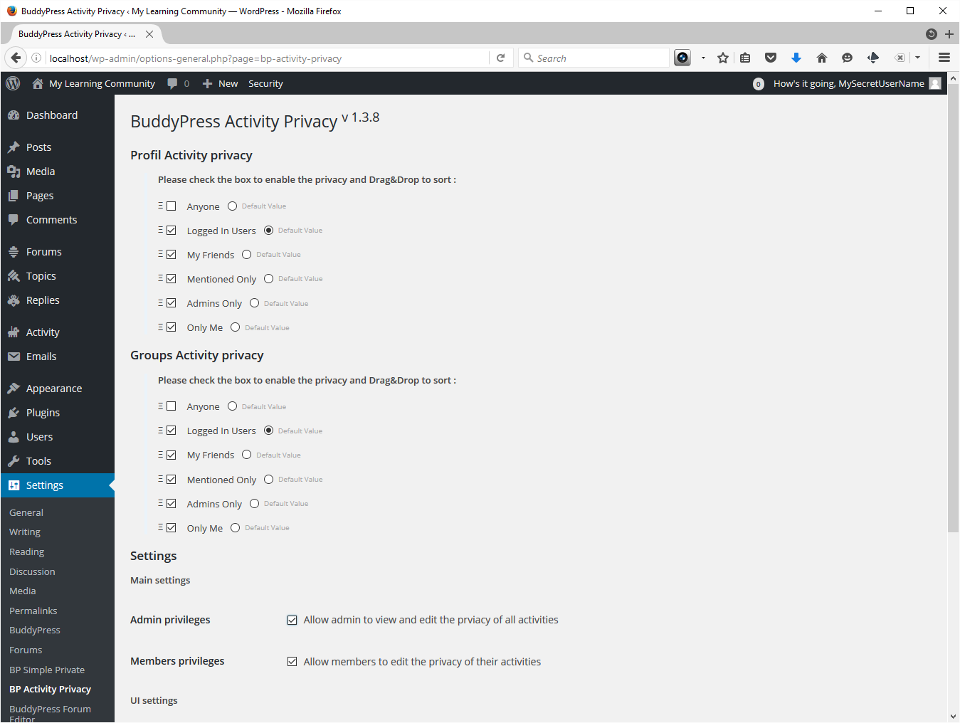
- BuddyPress Forum Editor
- 1 minute
-
Enhance the Forums WYSIWYG editor:
The BuddyPress Forum Editor enhances the forums WYSIWYG editor. I copy paste the entire list of options into the field and press Save.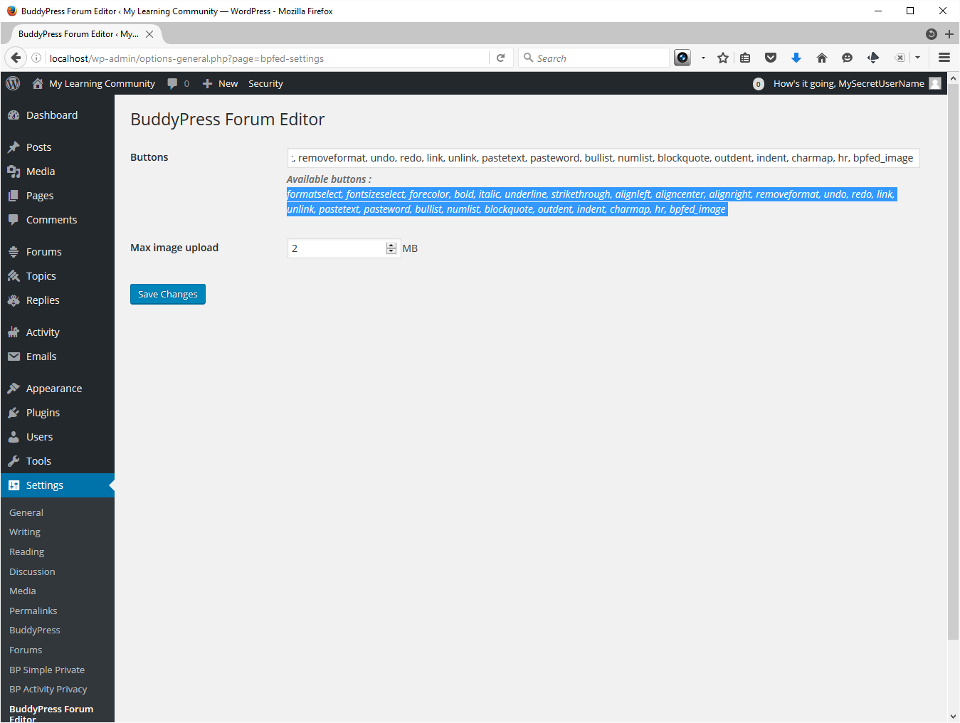
- PayPal Donation Button
- 5 minutes
- Appropriate in some situations
- Requires a PayPal merchant account
-
Many features:
Donation Button is quite comprehensive, with integration for mail systems and sandbox support for developers (make sure you got version 1.4.7 or higher). I’m not going to detail it here. I simply selected my currency, put in our merchant number, chose the button I liked, and saved it. I donated $5 to make sure it works—it does. The Purpose field shows up on the PayPal side, but has a limited length.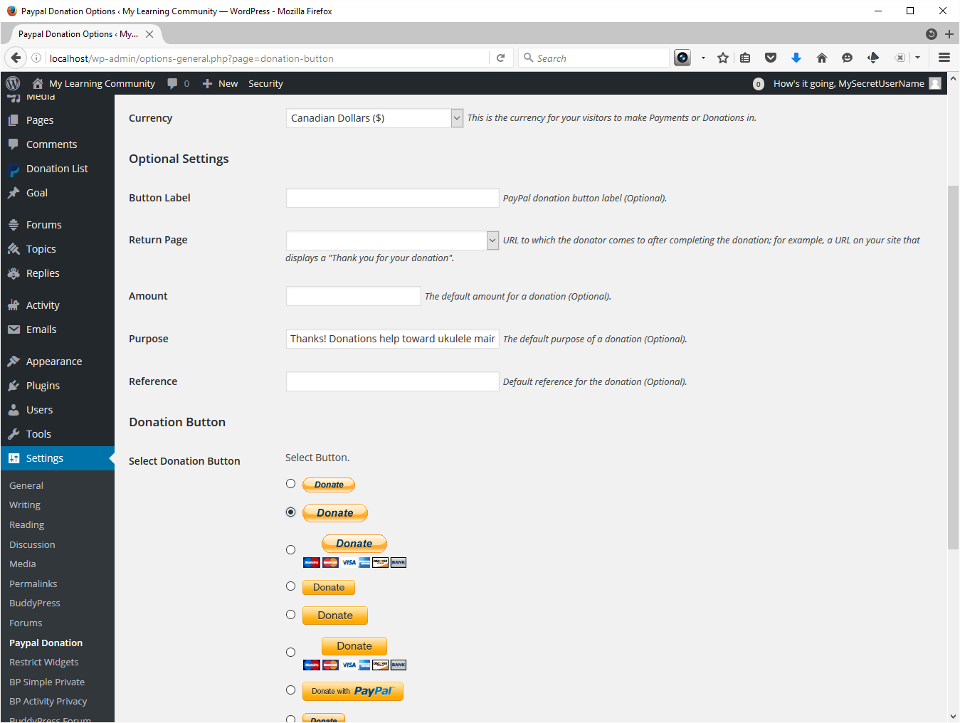
- Restrict Widgets
- 0 minutes
-
Default settings:
Restrict Widgets lets you restrict availability of widgets, sidebars and widget options to site administrators only. But that’s not what I need right away, and I left all the defaults unchanged.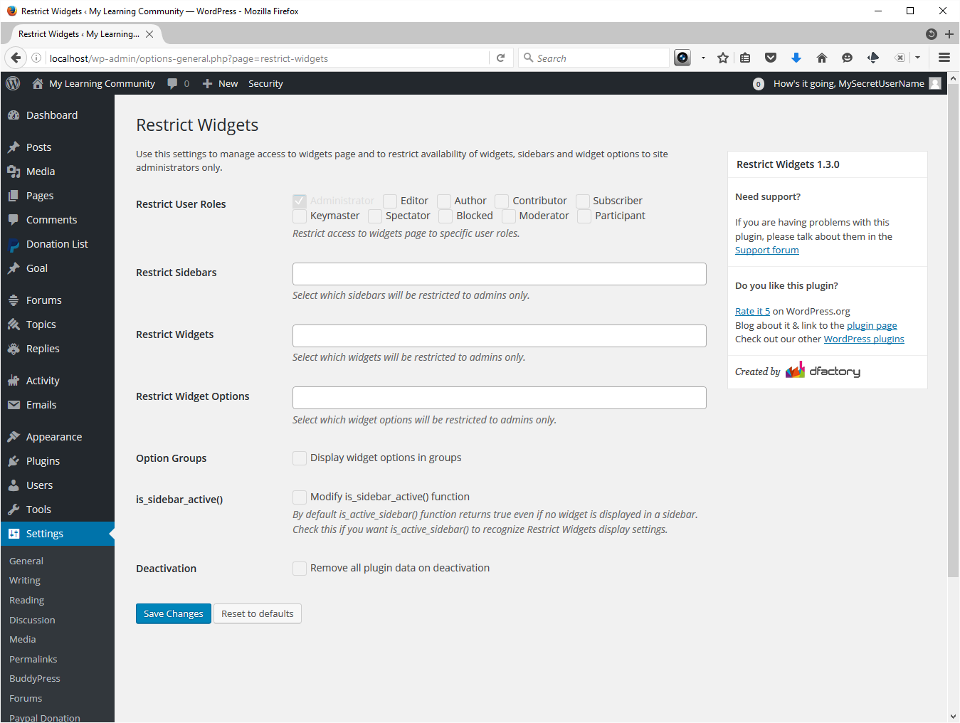
- Configure WidgetsThis is another very important step. BuddyPress has created a number of widgets you can place in any area WordPress thinks of as widget territory. I use sidebards. I added 4 to start, but you can play with it and set up what you need. I chose BuddyPress Login, Forums, Friends and Who’s Online. The 3 screenshots show the process for placing a widget in the sidebar, setting the widget visibility properties, and finally my completed list after dragging and dropping them where I want them.
- 5-10 minutes
-
Place widgets in the sidebar:
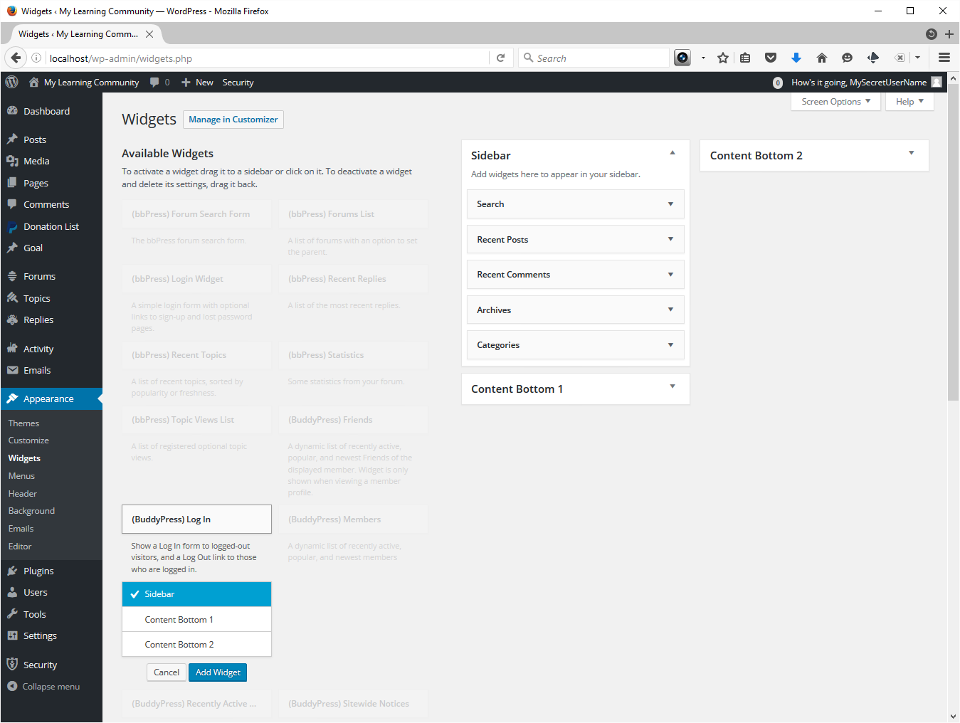
Set widget visibility:
Leave Login as you find it: Hide widget on… [none selected]. Set all the others to Show widget on… Logged in users.

Drag and drop widgets into place:

Move it to your live web host
Depending on your circumstances you could do this now, or wait until you’ve added users.
Transfer the files to your public_html directory
I use FileZilla to do this. The remote address is invariably ftp.your_domain.com. You’ll need the FTP Server information usually found in your web host’s after confirmation message, which they usually send once it’s fully set up, a day or two after your first receipt for payment.
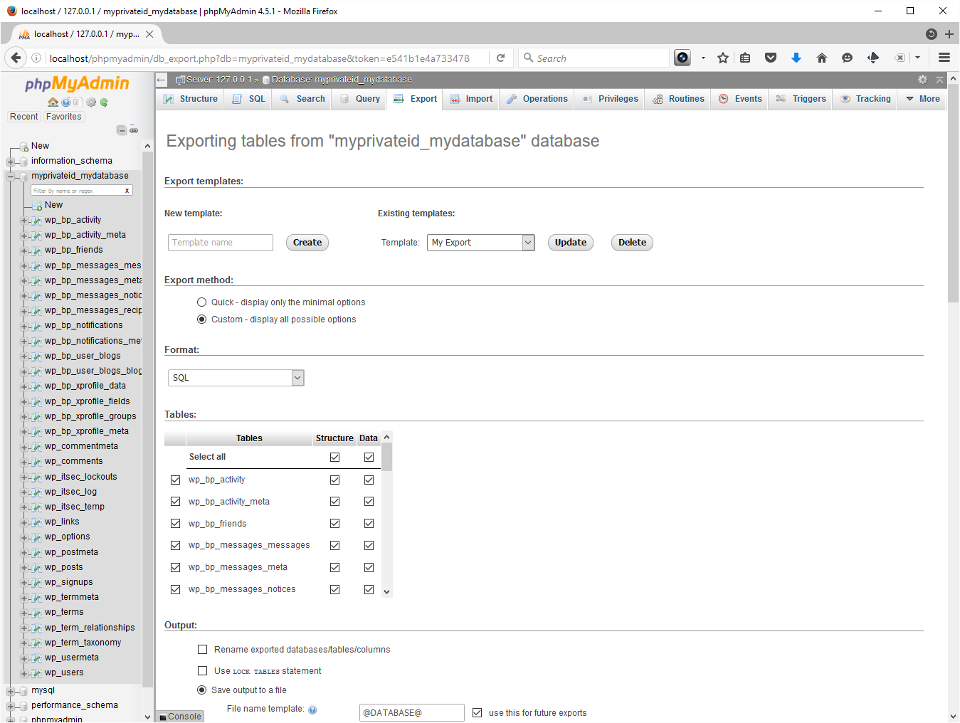
Export your test site database, and then import it to your live server
Export/Import using PHPMyAdmin
Return to localhost/phpmyadmin and select the WordPress database. Newer versions of PHPMyAdmin support export templates, and I’m using one here. The important things are to make sure all the tables are selected, and that you’ve got compression. Scroll down and press Go to do the export. The file will normally end up in your browser’s Downloads folder.
The final step is to log into your CPanel (or other site control panel) account on your web hosting server. If it’s the first time you can create a database just as we did above, and then use the Import tab. When the site exists and you want to update it with work you’ve done on your test server, best practice is to back up the database with an export first, drop all the tables, and import your localhost database into the just-emptied live one. If you’ve added files or updated plugins and themes you need to upload the affected folders by FTP. It sounds scary if you’re not used to it, but you’ll master it fairly quickly and build your own routines.
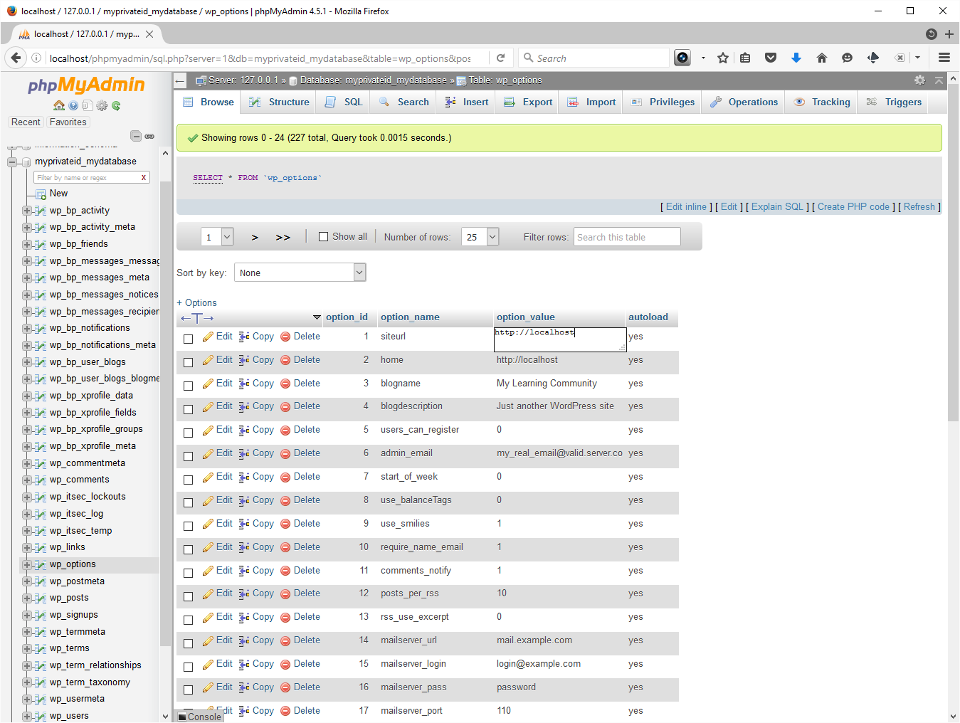
Don’t forget to change the site URL in the Options table!
Very important!: Every time you swap databases from one server to the other you’ll need to update the site_url and home options in the wp_options table, or your localhost will redirect to Live and vise versa. Select the table in the left. Usually those fields are the first two in the list. Double-click to enter the field in edit mode, type the real URL of your community (without an ending slash), and Tab out of it to save.
Setting up WordPress for Online Learning (Part 2)
In Part 2 I’ll tell you how I install the LearnPress LMS plugin for WordPress at SingingForLove.net. I just have to figure that out first!
It’s the nature of DIY technology projects that they often take a bit longer. For me, the rewards have always been that much greater, and tend to be proportional to the extra effort.
I hope you’ve found this helpful!
§
Leave a Reply